One option is to be very good at all the molecular techniques so that you can do all the prep yourself. This has the added benefit of giving you, the researcher complete control over the process, so you can adjust things as you see necessary for your particular sample type (sometimes improving on existing protocols), and this can save you a substantial amount of money over time. On the other hand, if you submit a prepped library to a sequencing provider, you take on some liability and failed runs can be assumed to be the result of a poorly-prepped library (this can be expensive). If you plan to do a lot of sequencing, I recommend this option, but that is for another post (coming very soon, I promise).
Another option, and the right way to start in my opinion, is to simply be able to produce high quality preps for your particular sample type (DNA or RNA). I will focus on DNA preps here, but the same concerns apply to RNA preps. I will try to note when your RNA protocol should deviate from my advice.
Nucleic acid extraction:
The hardest part of any of these projects will always be the DNA extraction. As long as you have high quality DNA (or RNA), the rest of your prep should progress without much effort. As a service provider, we know well the importance of being able to confidently produce a library for a user under a deadline. Maybe you work with E. coli and genomic DNA is easy to come by. You can grow up some liquid cultures overnight, have fresh tissue in the morning, and procure micrograms of pure, clean DNA by lunch time. But I work in an environmental lab, and things are never that easy unless we are doing clone libraries (which we haven't done in years now!). Soils are notorious for being inconsistent across sites in terms of just about everything, and some of the other tissues we work with (fungi, feces, roots) are also difficult to obtain high quality DNA from. You might think this is no problem, and that you should just purchase a kit from a company that is appropriate for your tissue. I would say you are mostly right, but this is still no guarantee that your DNA will be any good. Many great kits are available from suppliers such as MoBio, Qiagen, Life Technologies and Sigma, to name a few that I have used with success in the past. It's OK to pick up the phone and call a company and ask for a recommendation.
Getting the right kit is only half the battle. You now need to actually use it in order to be able to complete your project. For your sake, I hope that you purchased the kit that will do 100 preps even though you only have 45 samples. The reason I say this is that practice is required in order to do good work. Period. But in this case, of course I am referring to the molecular lab. Before consuming any of your precious sample, you might want to extract DNA from something else that best approximates your actual samples (an extra sample?). This will tell you a lot, and some of the kits even come with troubleshooting guides that can help you to adjust your technique.
In my experience with soil and root extractions, I find that adding a few small steel beads to the usually less-dense grinding beads that come in kits and adding a heating step to the lysis component makes all the difference. For beads I use 2.3mm chrome-steel from BioSpec. I usually grind soils for 2-10 minutes at 30 Hz, though I will do this in bursts of usually no more than 2 minutes at a time. Keep in mind that the longer you grind, the more likely you are to physically destroy the nucleic acids you wish to successfully obtain. I would suggest that while you might be OK to grind a soil sample for 10 minutes total, a plant leaf or root won't need long at all to be thoroughly pulverized (maybe 2 min maximum).
All kits have a lysis step, but not all kits do this step under heat. In most cases, you are OK to identify this step (indicated in all good protocols) and extend it and add heat (careful doing this with RNA, but still necessary for some tissues). For example, instead of violent grinding and heated lysis, MoBio PowerSoil has you add sample to the bead tubes and place them on a vortex adapter for 10 minutes. The 96-well version has you shake your extraction plates in a tissue disruptor for a total of 20 minutes. In both cases, I have found that with the soils for my dissertation project I need to do something else. I add 5 of the aforementioned chrome-steel beads to each tube or well. Then, I get a water bath (96-well blocks) or a heated block (minipreps) up to 70C before starting the prep. For both versions of the extraction I make use of our GenoGrinder for the initial grind (ours is a GenoGrinder 2000, but the latest model is a 2010). I prefer the GenoGrinder over other disruptors (e.g. Retsch MixerMill, BioSpec BeadBeater96) because it can be fine-tuned, and more importantly, has linear throw (versus swinging throw) that is longer than most tubes are tall. If using a disruptor with swinging throw, make sure you rotate your plates or tube racks part way through the grind so that all samples get reasonably even exposure to this vital step. For tubes I will grind samples twice for 2 minutes each (4 min total) and then place them on the preheated block (fill with water to ensure even heating of samples). Then I set a timer for 10 minutes and vortex tubes briefly in pairs before moving to the next step. For plates, I grind the samples twice for 5 minutes (10 min total) each and then place them in the water bath. After 20 minutes, I grind them again for 1 minute and replace them to the water bath for another 30 minute incubation. The troubleshooting guide with the MoBio kits suggests a shorter heated incubation and warning that yield may be reduced if this is done longer than 5 minutes, but I didn't really get any yield doing less than 10 or 20 minutes. This is why it is important to practice! After the heated lysis step, proceed with the remainder of the protocol as written.
Quality control:
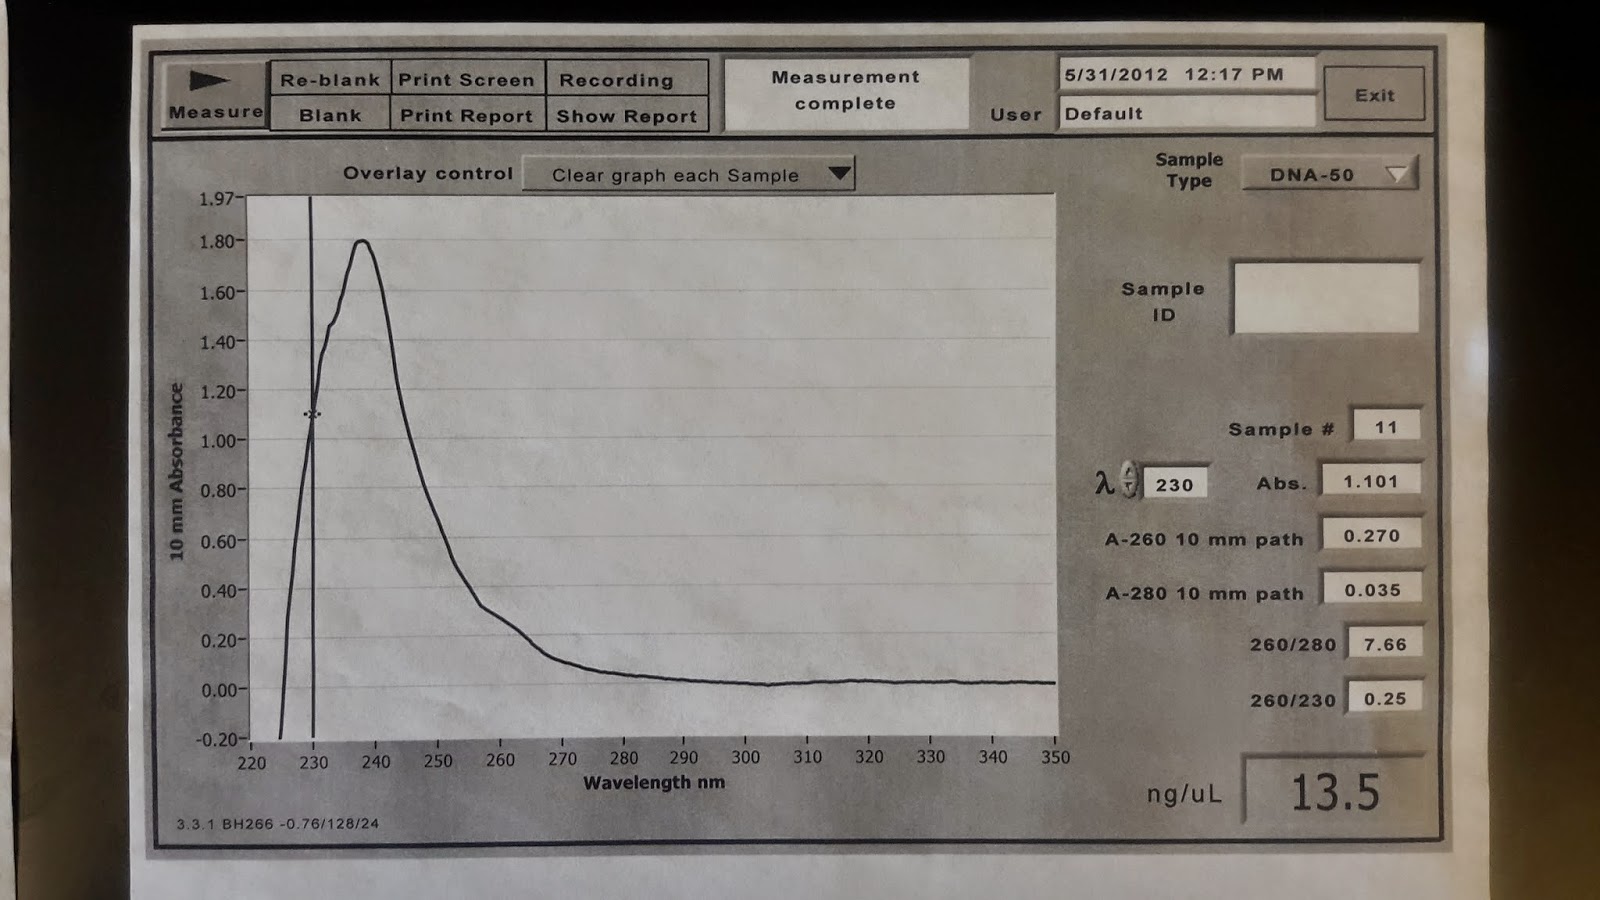
There are several things you can and should do to check the quality of your samples. The first is get an absorbance reading. Many people refer to this process as "Nanodrop," but this is simply the nifty spectrophotometer we use to obtain our absorbance data while consuming a very small amount of sample. Often the Nanodrop data is not encouraging, or people look only at the ng/uL value and get the wrong idea if there is coabsorbance at 260nm (where your DNA - the pyrimidines, that is - maximally absorbs light) due to something else absorbing maximally elsewhere (usually at 230nm). To give you an idea, here is an example of excellent absorbance data from a Nanodrop spec:

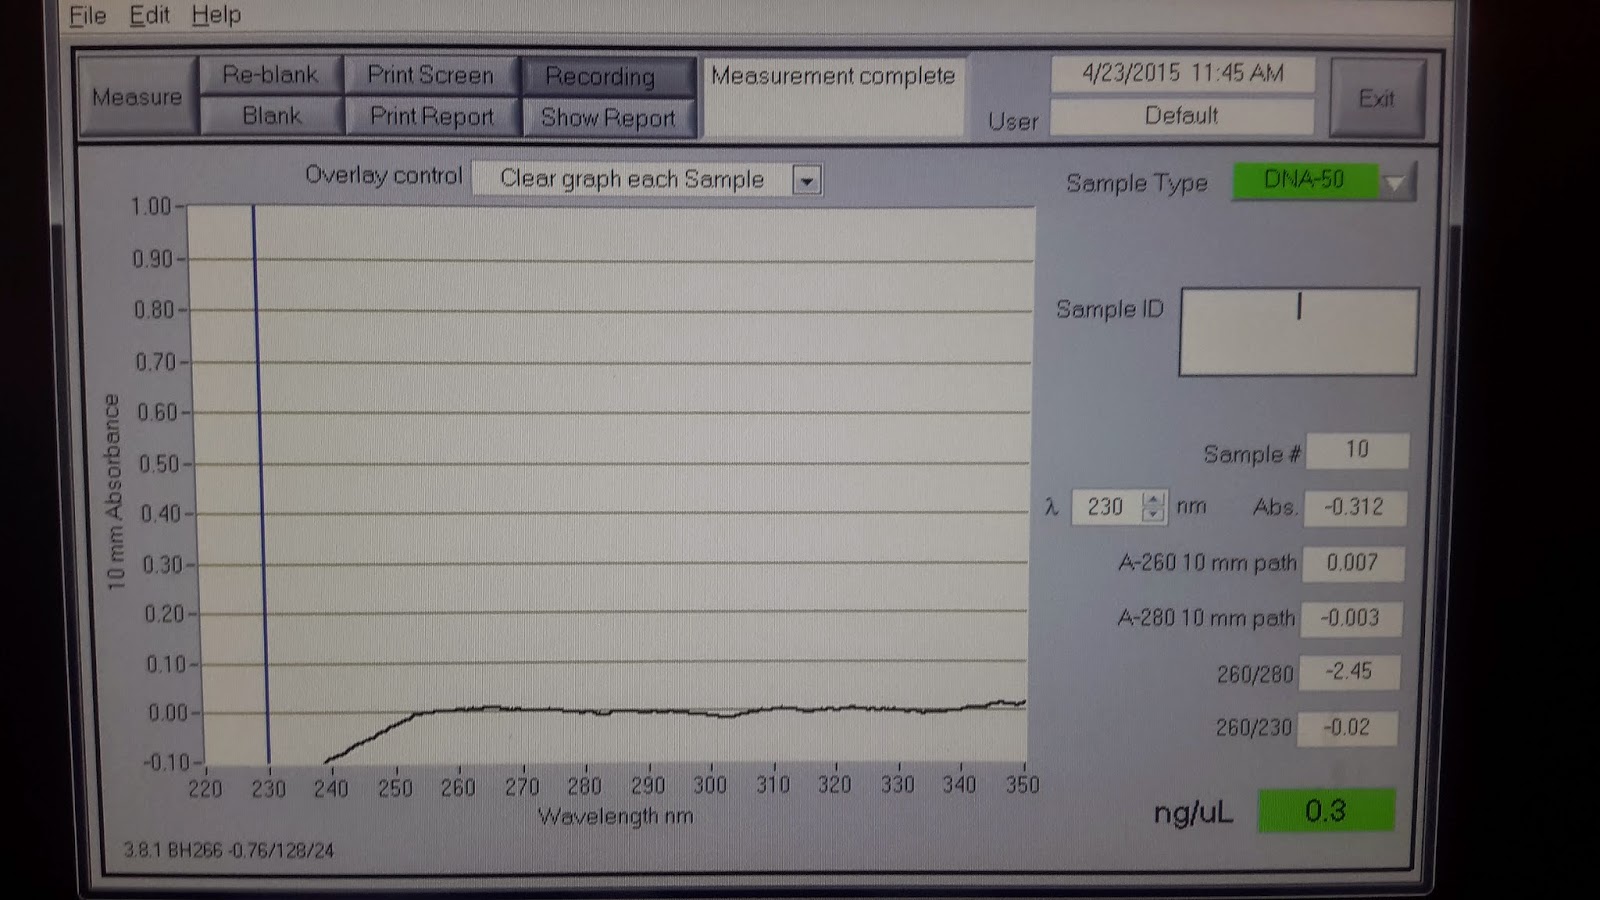
This is a result I got from a pine needle extraction, and you will never see something like this from a soil extraction, but this is a nearly perfect result (I keep it taped on the wall next to the instrument so people can see what to aspire to). Ideally your 260/280 ratio is at least 1.8 and your 260/230 ratio is at least 1.5. If this is the case, the reported concentration can be reasonably trusted, though I don't really consider Nanodrop concentrations reported at 10ng/uL or less as this is about the detection limit of the instrument. Doubt this statement? Consider this Nanodrop result from my 10ng/uL fluorescence standard (high quality calf thymus DNA):

You can see the 260/280 is quite high while the 260/230 is extremely low. In this case, both of these values are meaningless, while the concentration calculation is almost half what it should be. The only thing you can trust here is that you can clearly see the bump at 260nm, so you know something is there.
Here is an example of a Nanodrop result of a typical soil extraction:
If you are embarking on a dissertation or thesis project and this was the result you got, you might feel like crying, but have no worry, this is quite acceptable! You can barely discern the 260nm bump, but more importantly, you don't have a giant peak at 230nm. Consider this result from a similar sample:
The concentration looks encouraging, but that giant peak on the left is truly worrisome. You can see a shoulder where the curve crosses 260nm which indicates the presence of DNA, but that giant peak at 240nm indicates there is something contaminating your sample. In this case, I believe the problem is contaminating EDTA as I was playing with different purification solutions at the time (that trace was from 2012). EDTA in high concentration can sequester divalent cations that might be important to the progress of some crucial downstream step (think the Mg2+ in PCR). Another common problem with a similar absorbance profile is guanidine salt (lysis agent) that carried over from the extraction kit. Guanidine salts (GuSCN or GuHCL) are powerful denaturants that can destroy active enzymes you might need for something like PCR or restriction digestion. Fear not, as such things can often be removed with a cleanup. Many might opt for an ethanol precipitation here. Just make sure to rinse your precipitated pellet with plenty of 70% ethanol before drying and resuspending as you want to make sure that as much of that contamination as possible is solubilized and removed. Check out my post on bead cleanups which are also effective at removing contamination problems and is my preferred method for such problems anymore. There are also column-based cleanups, but these can be expensive and tend to incur loss of a surprising percentage of sample as you remove the impurities. If the last image was the result I had for some set of samples, I would use the bead cleanup approach, and then wash three times with 70% ethanol, making sure that the first wash at least had enough volume to contact all the inner surfaces of the sample vessel (plate well or tube). Second and third washes can have lower volumes. Washes need not be very long, a minute or two will suffice (probably still more than is necessary). Make sure to dry the samples, and then resuspend in Tris-Cl pH 8-9 and get a new Nanodrop result.
An example of a gel-extracted PCR product which contains a LOT of guanidine salt. Agarose solubilization buffers typically contain GuSCN. Note the peak maximum is at 230nm in contrast to the EDTA example above. This sample was submitted to EnGGen for Sanger sequencing, but failed to produce any signal:

A couple of notes about guanidine and EDTA carry-over. DNA binding to either beads or a silica membrane relies on salt-bridge formation between the DNA and the beads or the membrane and guanidine can participate in this process. This means that while most of the salt will be washed away, some will likely remain. Conversely, EDTA can sequester the very salts you need to facilitate the binding of DNA to your immobilization substrate of choice, so when you do the binding step, you might just lose most or all of your DNA. You can increase the volume of bead solution used in a bead cleanup or the ratio of binding solution used in a column cleanup to avoid this problem. Or else an ethanol cleanup will avoid the complications of either of these approaches.
After Nanodrop:
You may have noticed that I wasn't seriously suggesting that you use the concentrations provided by the Nanodrop. I am far more interested in what the Nanodrop can tell me about the quality of samples in terms of potential contaminants that can cause problems downstream. If you want real concentrations, you need to determine them by fluorescence. Most labs use something called a Qubit for this purpose. The Qubit works OK, but I prefer the Dynaquant300 fluorometer from Hoefer which has apparently been discontinued. I think this unit from Promega may be an acceptable replacement. The DQ300 can be equipped with a micro-cuvette adapter which allows me to use the same PicoGreen reagent used in the Qubit, but at much lower volume (60uL) and the sample is read through a borosilicate cuvette rather than a plastic tube which offers more consistent concentration determination. However you do it, fluorometry is the best way to get an accurate concentration determination as the dyes that are used (good ones, anyway, some are less good) are specific to the substrate of interest (eg, dsDNA or RNA). While it is not always necessary to obtain fluorescence quantification values, I maintain that it is a good idea and for all of my own work I use this to normalize all samples within an experiment to the same concentration prior to embarking on molecular analyses. In many publications you will see something much less involved such as "DNA was extracted with some kit, and diluted 100-fold prior to PCR." This really bothers me as it lacks useful details, and is pretty much not reproducible. In short, this is laziness on the part of the researcher. On the other hand, if you have something that works, why scrutinize it terribly? I can definitely see why such things are avoided sometimes. If you need accurate quantities of sample to send to your sequencing provider, use fluorescence to ensure you are actually providing the correct quantity.
Gel analysis:
This is the old-school method for checking your DNA. Run some DNA extract (~10uL) on a gel and it should migrate well-above the largest band. I used to use a HindIII digest of lambda-phage for this (largest band ~23kb), but now I just use my favorite ladder (KAPA express ladder) and if the genomic DNA is larger than the largest band I am satisfied. For difficult samples, you may not have enough DNA to see anything. If you do this check, you want a large, discrete band. If there is streaking in your sample, you may have a problem.
PCR testing:
The proof is in the pudding, as they say, so the real test of your sample is if it can be manipulated. Despite everything I have put in this post so far, if you can get your sample to work, you have little to worry about. For preps that rely directly on PCR, PCR is of course the best test of sample viability. But even if your sample is destined for a different prep which utilizes a different initial enzyme (e.g., restriction endonuclease for RADseq or transposase for Nextera) it also can tell you if your sample is clean enough for enzymatic treatment. For this reason, I will typically do a PCR test of every sample to see if I can get some standard loci to amplify. In most cases, this might be an rDNA locus (e.g., 16S or ITS) since primers for these loci are universal. However, if you are doing an mRNA pulldown, make sure you test your converted cDNA with a housekeeping gene instead (such as CO1) since if your pulldown was efficient, your sample should not contain any remaining ribosomal sequences. Ideally, your sample will work well with a generic polymerase and not require something special such as an adjutant (e.g., BSA, betaine) or an advanced enzyme such as 2G Robust from KAPA. It may be useful to contact your provider and find out some protocol details if your sample is to be subjected to PCR. For instance, for PCR-based amplicon preps such as 16S that we generate here at EnGGen, we use Phusion polymerase, so we encourage users to test their samples with Phusion using our PCR protocol (more on that in my next post).
While PCR testing might seem easy and straightforward, there are a couple of tricks that can be done initially which can save you a lot of time and headache later on. The first I recommend is to boost your MgCl2 concentration to 3.0 mM while testing your sample. This has the effect of increasing the activity of the polymerase and can ensure that you see a product if a product can be produced. In some cases this also causes non-specific amplification (PCR artifacts) in which case you should roll back your MgCl2 to where this doesn't happen, and/or increase your annealing temperature. The second trick is to start off with a dilution series PCR. This does a few things simultaneously. Crucially, it allows you to determine a dilution factor which improves results for your sample without actually creating any dilutions (which can needlessly occupy freezer space and consumes part of your precious sample volume). In some cases you may find that an already low-concentration template works well at a high dilution factor such as 1/100x. Like Nanodrop data, this can be indicative of the presence of PCR inhibitors which are sufficiently diluted away by the dilution series, even as there is still enough template DNA present for the reaction to efficiently proceed. If this is the case, you should still consider doing a cleanup as very dilute samples may amplify, but may also do so with low efficiency and increased bias which will diminish your ability to discern community patterns from your data.
So how to do a PCR dilution series? It is very easy as long as you keep in mind that like all molecular biology processes, homogenization of your reactions is crucial to your success. For each sample, plan to prepare 3 PCR reactions in 10uL total volume, using 1 uL of template DNA each. Make enough master mix to aliquot 9 uL for each PCR reaction (minus the template), and distribute to your PCR plate (avoid strip tubes as they often have issues with evaporation). I prefer to distribute the master mix so that each sample will be represented in three adjacent wells of the same row. Add 1 uL DNA to the first reaction, seal, mix and spin down. Now take 1 uL of the first reaction and deliver it (as template) to the second reaction. This creates your 1/10x dilution. Repeat the seal, mix, spin down, and move 1 uL of the second reaction to the 3rd reaction (for 1/100x). If you would prefer a 1/50x dilution, move 2 uL instead. Upon getting gel results (2 uL per well is more than enough), examine which reactions worked the best, and determine approximately the optimal dilution for your samples and what the actual concentrations are of the successful products.
EnGGen PCR testing suggestions:
Use the same polymerase we will use for your prep (usually Phusion HotStart II).
Get cycling conditions from us before you start.
Get primers from us or compare sequences against ours before you start.
Happy DNA prepping!